Pixi is a cross-platform package manager that can manage complex development workflows.
There are two main features:
- Installing tools globally (
pixi global) - Project workflow
What does Pixi solve?
Pixi’s goal is to solve fast reproducible developer and deployment workflows. Often written as “it worked on my machine”. Pixi gives the developer all the required tools to create an environment that they can share with colleagues and servers. While being sure there is nothing missing from the environment to run the project.
There are some key focus points to solve this problem.
- Reproducibility: Pixi always locks all packages it installs into the environments into a lockfile
- Speed: By using modern technologies like Rust and a big focus on optimizations, Pixi is using as much of the machines capabilities to do it’s work as fast as possible.
- Virtualization: By separating environments in dedicated folders, users can easily set up, build, and test a project without worrying about their other projects break in the meantime.
- cross-platform: With everything Pixi can do it tries to bridge the gaps between the different operating systems, making collaboration easier than before.
- cross-language: While Python is well-supported language, Pixi doesn’t stop there, it also focusses on C/C++, CUDA, Rust, Fortran and more.
All of these points are wrapped in a set of main functionalities.
- Virtual environment Management: Pixi can create conda environments and activate them on demand.
- Package management: Pixi can install/update/upgrade/remove packages from these environments
- Task management: Pixi has a cross-platform task runner built-in, allowing users to share the same commands on all platforms.
We’ll dive deeper into these topics later on.
The project workflow
Pixi is designed to be used in a project-based workflow.
Tools like poetry, uv, npm, deno, cargo, maven and pixi are all designed to be used in a project-based workflow.
This means that you can create a project and then use Pixi to manage the dependencies and tasks for that project.
You can think of a project as a self-contained directory that contains all the files and configurations needed to build and run your application.
Often the project will keep the environment it installs close to the project folder itself, so it will not clutter the system.
This is a great way to keep your projects organized and to avoid conflicts between different projects.
Project-based vs Environment-based vs System-based
To give a little background why Pixi is designed this way, let’s take a look at the different ways to manage packages and environments.
Supporting tools: pixi, poetry, uv, npm, deno, cargo, maven
Pros:
- Isolated environments per project (no conflicts)
- Easy to reproduce and share with others (declarative)
- Keeps dependencies close to the project
Cons:
- Potentially use more disk space (multiple environments)
- Managing environments over multiple projects is less straightforward.
Supporting tools: conda, mamba, micromamba, pip, pipenv, uv pip
Pros:
- Easy to share environments across multiple projects
- Isolated environments (no conflicts)
Cons:
- You keep a mental model of what is installed in which environment
- Harder to reproduce exact environments later
Supporting tools: apt, rpm, brew, choco, winget, scoop, flatpak
Pros:
- Simple, everything installed globally
- Every OS has a default package manager
- Guaranteed to work with system libraries
Cons:
- Very High risk of dependency/version conflicts with other projects (especially Python)
- Hard to reproduce or share setups
- Limited flexibility when it comes to versions
Creating a project
As Pixi uses the project-based workflow, it uses a manifest file to keep track of the dependencies and tasks for the project.
This is also known as declarative configuration, where you describe what you want, and Pixi will take care of the rest.
The manifest file is called pixi.toml, or you can use pyproject.toml, and it is located in the root of the project.
To create a new project, you can use the pixi init command.
pixi init my_projectThis will create a new directory called my_project and initialize a new pixi.toml file in it.
my_project
├── .gitattributes
├── .gitignore
└── pixi.toml
The pixi.toml file is a TOML file that contains the configuration for the project.
1 2 3 4 5 6 7 8 9 10[workspace] authors = ["Jane Doe <jane.doe@example.com>"] channels = ["https://prefix.dev/conda-forge"] name = "my_project" platforms = ["osx-arm64"] version = "0.1.0" [tasks] [dependencies]
The pixi.toml doesn’t have the basic Python package structure like the pyproject.toml file, because it is not a Python package by default.
As pixi.toml has a JSON schema, it is possible to use IDE’s like VSCode to edit the field with autocompletion.
Install the Even Better TOML VSCode extension to get the best experience. Or use the integrated schema support in PyCharm.
pixi init my_pyproject --format pyprojectThis will create a new directory called my_pyproject and initialize a new pyproject.toml file in it.
It will also create a src directory with a my_pyproject subdirectory and an __init__.py file in it, to make it a simple Python package.
my_project
├── .gitattributes
├── .gitignore
├── pyproject.toml
└── src
    └── my_pyproject
        └── __init__.py
The pyproject.toml file is a TOML file that contains the configuration for the project.
1 2 3 4 5 6 7 8 9 10 11 12 13 14 15 16 17 18 19[project] authors = [{name = "Jane Doe", email = "jane.doe@example.com"}] dependencies = [] name = "my_pyproject" requires-python = ">= 3.11" version = "0.1.0" [build-system] build-backend = "hatchling.build" requires = ["hatchling"] [tool.pixi.workspace] channels = ["https://prefix.dev/conda-forge"] platforms = ["osx-arm64"] [tool.pixi.pypi-dependencies] my_pyproject = { path = ".", editable = true } [tool.pixi.tasks]
Note that the pyproject.toml file is a little different from the pixi.toml file.
The pyproject.toml file is a standard file used by many Python tools, thus it makes it easier to share the project with others.
The only difference between the two files is that the pyproject.toml file has a [tool.pixi prefix to the Pixi specific sections.
For the rest of this tutorial, we will use the pixi.toml file as the main file.
Managing dependencies
After creating the project, you can start adding dependencies to the project.
Pixi uses the pixi add command to add dependencies to the project.
This command will , by default, add the conda dependency to the pixi.toml or pyproject.toml file, solve the dependencies, write the lockfile and install the package in the environment. e.g. lets add numpy and pytest to the project.
pixi add numpy pytestThis will result in the following manifest file:
1 2 3 4 5 6 7 8 9 10 11 12[workspace] authors = ["Jane Doe <jane.doe@example.com>"] channels = ["https://prefix.dev/conda-forge"] name = "my_project" platforms = ["osx-arm64"] version = "0.1.0" [tasks] [dependencies] numpy = ">=2.2.6,<3" pytest = ">=8.3.5,<9"
If you want a specific version of a package, you can specify the version in the command.
pixi add numpy==2.2.6 pytest==8.3.5Or you can make it more specific by using multiple types of specifiers. For the versions you can use the following specifiers:
==: Exact version, e.g.numpy==2.2.6>=: Minimum version, e.g.numpy>=2.2.6<=: Maximum version, e.g.numpy<=2.2.6>: Greater than version, e.g.numpy>2.2.6<: Less than version, e.g.numpy<2.2.6!=: Not equal to version, e.g.numpy!=2.2.6~=: Compatible release, e.g.numpy~=2.2.6(equivalent to>=2.2.6, <3)
All of these specifiers can be combined, e.g. numpy>=2.2.6,<3, or numpy~=2.2.6,!=2.2.7.
For the [dependencies] section, Pixi supports the conda MatchSpec format, which includes:
| Field | Example | Comment |
|---|---|---|
name | numpy = "*" | The name of the package, without the version specifier |
version | numpy = ">=2.2.6,<3" numpy = {version = "==2.2.6"} | The version specification of the package. |
build | numpy = {build = "py39h1234567_0"} | The build string of the package |
build_number | numpy = {build_number = 0} | The build number of the package |
channel | numpy = {channel = "conda-forge"} | The channel where to get the package from (must be defined in [workspace]) |
license | numpy = {license = "BSD-3-Clause"} | The license of the package |
PyPI dependencies
Pixi can also install packages from PyPI, it does this through it’s integration with uv.
In the Rust code Pixi depends on the uv package manager to install the packages from PyPI.
This means that you can use the pixi add --pypi command to install packages from PyPI.
pixi add --pypi pydanticWhich results in it being added to the manifest file as:
In the pixi.toml file, it will be added to the [pypi-dependencies] section.
1 2[pypi-dependencies] pydantic = ">=2.11.5, <3"
In the pyproject.toml file, it will be added to the [project] section in the normal case.
1 2 3[project] # ... dependencies = ["pydantic>=2.11.5,<3"]
Things like path and editable are added through the Pixi specific section.
For example:
1 2[tool.pixi.pypi-dependencies] my_pyproject = { path = ".", editable = true }
What pixi does differently from managing PyPI packages through other package managers, is that it will install the packages in the same environment as the conda packages, but will not overwrite the conda packages.
We’ve got a mapping between the conda packages and the PyPI packages, so that we can let uv know which packages to install and which packages to ignore because they are already installed.
Special types of dependencies
Pixi has a few special types of dependencies that you can use in the project.
| Type | Description | Example |
|---|---|---|
git | Install a package from a git repository | git = "https://github.com/user/repo.git" |
branch | Install a specific branch from a git repository (requires git) | branch = "main" |
tag | Install a specific tag from a git repository (requires git) | tag = "v1.0.0" |
rev | Install a specific commit from a git repository (requires git) | rev = "abc123" |
path | Install a package from a local directory | path = "./local-python-package" |
editable (pypi only) | Install a package in editable mode | editable = true |
url | Install a package from a URL | url = "https://example.com/package.whl" |
Lockfile
The lockfile is a file that contains the exact versions of the packages that were installed in the environment. This file is used to ensure that the same versions of the packages are installed in the environment when the project is shared with others. What should you know about the lockfile?
- The lockfile is called
pixi.lockand is located in the root of the project, next to thepixi.tomlorpyproject.tomlfile. - The lockfile is a YAML file that contains the exact versions of the packages that were installed in the environment.
- The lockfile is automatically (re-)generated when you
add,remove,updatea package in the project, or when you runpixi install/run/shell/lockand it’s not existing yet. - The lockfile is meant to be shared with others, so that they can reproduce the same environment.
- The lockfile is not meant to be edited manually, as it is automatically generated by Pixi.
1 2 3 4 5 6 7 8 9 10 11 12 13 14 15 16 17 18 19 20 21 22version: 6 environments: default: channels: - url: https://prefix.dev/conda-forge/ indexes: - https://pypi.org/simple packages: osx-arm64: - conda: https://prefix.dev/conda-forge/osx-arm64/bzip2-1.0.8-h99b78c6_7.conda - pypi: ... packages: - conda: https://prefix.dev/conda-forge/osx-arm64/bzip2-1.0.8-h99b78c6_7.conda sha256: adfa71f158cbd872a36394c56c3568e6034aa55c623634b37a4836bd036e6b91 md5: fc6948412dbbbe9a4c9ddbbcfe0a79ab depends: - __osx >=11.0 license: bzip2-1.0.6 license_family: BSD size: 122909 timestamp: 1720974522888 - pypi: ...
Example lockfile, highly simplified for readability
Managing tasks
Pixi has a built-in cross-platform task runner that allows you to define tasks in the manifest.
This is a great way to share tasks with others and to ensure that the same tasks are run in the same environment.
The tasks are defined in the [tasks] section.
Basic tasks
You can use the pixi task command to modify the tasks in the project.
pixi task add hello "echo Hello World"This will add a new task called hello to the project, which will print Hello World to the console.
1 2[tasks] hello = "echo Hello World"
You can also use the pixi run command to run the tasks in the project.
pixi run helloThis will run the hello task and print Hello World to the console.
Environments
Now you know the basics of dealing with the Pixi manifest basics. Next step is actually use the environments it can create for you.
Activating environments
Because Pixi creates virtual environments for you, it is important to activate the environment before running any commands.
You can do this by using the pixi shell or the pixi run command, these commands will automatically activate the environment for you.
pixi run python -VV
# or:
pixi shell
python -VV
exit
Activating an environment is not alot more than running a script that sets the environment variables for you.
To investigate this, you can use pixi shell-hook to view what the shell script looks like.
pixi shell-hookThis will print the shell script that is used to activate the environment.
Multiple environments
Pixi can create multiple environments for you, so you can easily switch between them.
This is similar to how conda works, but Pixi keeps them specific to the project.
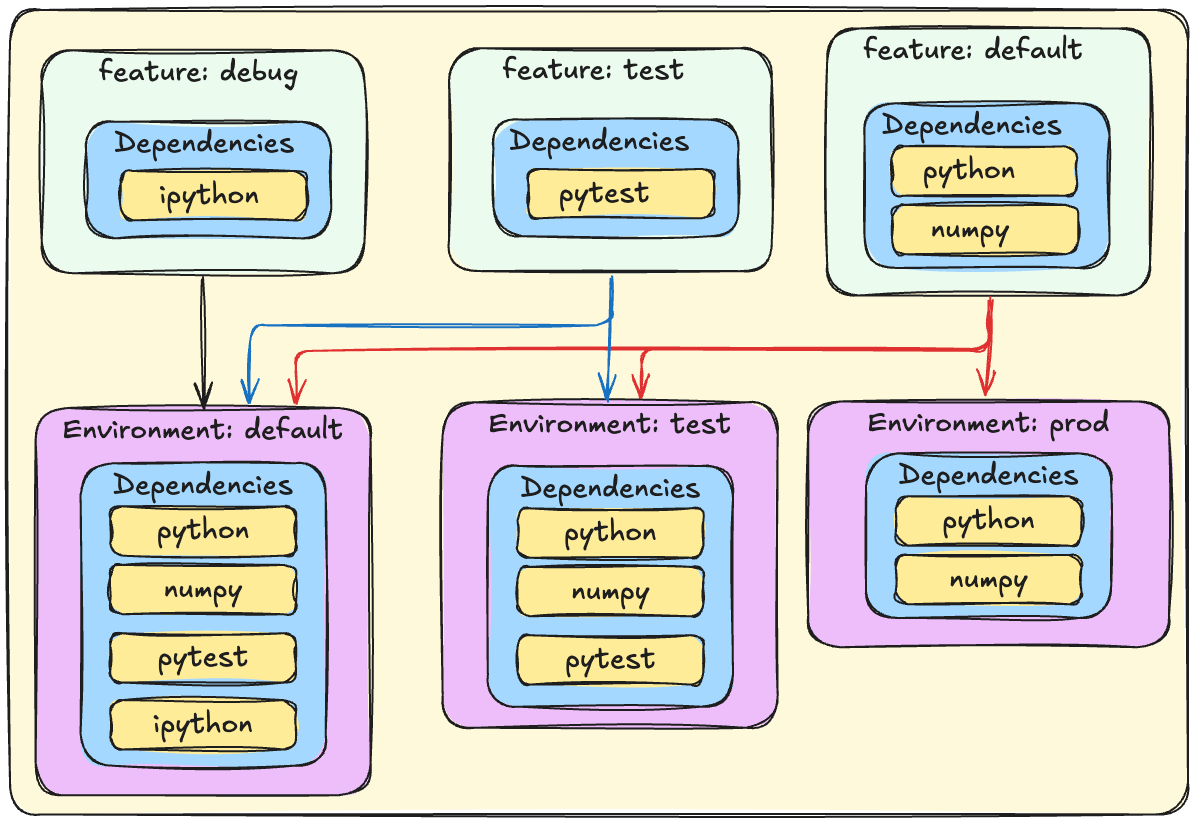
Multi environment feature as if it was LEGO.
Pixi helps you make different LEGO sets (environments) using bags of parts (features). You can reuse parts for multiple sets without copying them.
LEGO sets (environments):
- One set is for playing (has lots of fun tools).
- One set is for testing (has only what you need to check if stuff works).
- One set is for shipping (super clean, just what’s needed to run).
Bags of parts (features):
- One bag has all the tools you need to play.
- One bag has all the tools you need to test.
- One bag has all the tools you need to ship.
By combining these bags, you can make all the different LEGO sets you want. Keeping every set clean and tidy, without duplicating the parts around.
The best way to explain this is to give an example.
[dependencies] # Read this as `[feature.default.dependencies]`
python = ">=3.11,<3.12"
numpy = "*"

[feature.test.dependencies]
pytest = ">=8.3.5,<9"

[feature.format.dependencies]
ruff = "*"

[feature.debug.dependencies]
ipython = "*"

[environments]
# A development environment with all the tools to play with, overwriting the default environment
default = {features = ["test", "debug", "format"], solve-group = "default"}

# A testing environment with only the tools to test, great for CI
test = {features = ["test"], solve-group = "default"}

# A production environment with only the tools to run the code
# The default feature is always included, so you don't need to specify it
prod = {features = [], solve-group = "default"}

# A minimal environment with only the tools to format the code
format = { features = ["format"] , no-default-feature = true }
This will create the following environments:
| Environment | Features | Dependencies | Solve Group |
|---|---|---|---|
default | test, format, debug, default | python, numpy, pytest, ruff | default |
test | test, default | python, numpy, pytest | default |
prod | default | python, numpy | default |
format | format | ruff | None |
More information about the features can be found in the documentation.