Hardware (optional)
An NVIDIA GPU
This tutorial focuses on hardware acceleration for CUDA environments which require an NVIDIA GPU to use. While an NVIDIA GPU is not required to be able to work through the tutorial, access to one will be required to run the examples.
Software
This tutorial requires minimal software to be installed in advance:
A computer running an 64 bit version of Linux, macOS, or Windows.
At the moment a laptop is required and an ARM based tablet will not be sufficient.
Git, if not already familiar with
gitand GitHub, please installghas well to simplify the workflow.Highly recommend a IDE like Visual Studio Code or PyCharm.
Web Platforms (optional, but encouraged)
For this tutorial we would like you to create your own Git repository where you add the results of your work as you move through the tutorial so that you have a sharable form of what you have learned by the end. It doesn’t need to be GitHub (GitLab.com or some other alternative exist) but for the sake of consistency, the instructions will assume you are using GitHub.
Installation
Pixi
To install Pixi follow the installation instructions for your particular machine and then restart your shell.
curl -fsSL https://pixi.sh/install.sh | shpowershell -ExecutionPolicy ByPass -c "irm -useb https://pixi.sh/install.ps1 | iex"Pixi Shell completions
Additionally, install the Pixi shell completions for your particular shell choice.
Git
You probably already have Git installed on your machine. You can check with
command -v gitIf the command doesn’t return a filepath to the git executable, first make sure you have Pixi installed, as described above, and then run
pixi global install gitYou can now use the Git anywhere on your machine.
GitHub CLI (gh)
If you are not already familiar with git and GitHub, we recommend installing the GitHub CLI to simplify the workflow.
To install the GitHub CLI, first make sure you have Pixi installed, as described above, and then run
pixi global install ghThen log in to your GitHub account with
gh auth loginYou can now use the GitHub CLI anywhere on your machine.
Brev
Brev CLI
Brev on Windows
As described in the Brev docs
Brev is supported on Windows currently through the Windows Subsystem for Linux (WSL).
To participate in the GPU component of the workshop with Brev on a Windows machine make sure that you have
WSL installed and configured
Virtualization enabled in your BIOS
Ubuntu 20.04 installed from the Microsoft Store
For the portion of the tutorial where GPUs will be used we’ll be working on an NVIDIA Brev instance.
To install the CLI API for Brev, we’ll use pixi global so make sure you first have Pixi installed, as described above, and then run
pixi global install brevYou can now use the Brev CLI anywhere on your machine. Check out the CLI options with
brev --helpSetup a Personal GitHub Repository
To share your work from this tutorial, we will create a GitHub repository to store your code and results. This will allow you to easily share your work with others and keep track of your progress, or share it with the Brev instance.
Create a personal GitHub account if you don’t have one yet.
Add a new repository to your account through this link: Create a new repository.
Name the new repository
reproducible-cuda-scipy-2026, make it public, and give it a README and an open source license (e.g. MIT License).
To streamline this we recommend using the GitHub CLI to create the repository.
Feel free to change any of the options below to suit your needs, but the following command will create a new public repository with a README, a Python .gitignore, and an MIT license:
gh repo create reproducible-cuda-scipy-2026 \
   --public \
   --description "Reproducible CUDA Accelerated Workflows for Scientists with Pixi at SciPy 2026" \
   --add-readme \
   --gitignore Python \
   --license MIT \
   --clone
Because of the --clone option, this will also clone the newly created repository to your local machine.
Now you can navigate to the newly created repository directory:
cd reproducible-cuda-scipy-2026Now you have a GitHub repository set up to store your work from this tutorial.
Prepare Brev Instance
Create an NVIDIA Brev account
To access the NVIDIA Brev instance you’ll also need to create an NVIDIA Brev account.
Visit https://
login .brev .nvidia .com /signin and fill in your email address and agree to the terms of use. Check your email address that you used to create the account for verification email with further instructions.
Login to Brev account with Brev CLI
To validate your Brev account and your Brev CLI install, login to your Brev account from the command line with brev login.
brev loginPrepare an NVIDIA Brev instance
Later on in the SciPy 2026 tutorial, we’ll use a coupon code to provision a new Brev GPU instance environment.
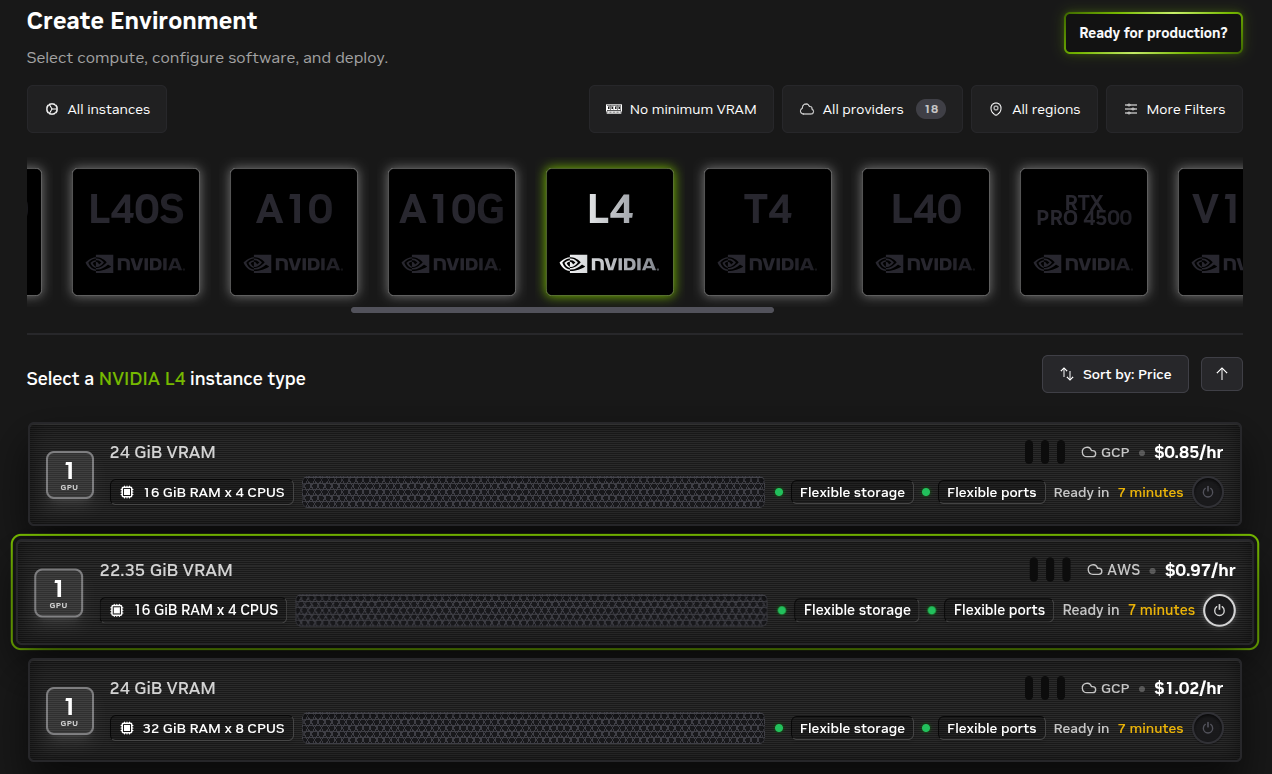
The particular configuration we’ll be using is:
1x NVIDIA L4 GPU
22.35GiB VRAM
16GiB RAM x 4 CPUS
AWS
Through the online NVIDIA Brev platform
You can select the Brev instance configuration from the Brev new environment page, but we recommend using the command line to ensure that you get the correct setup.
Access the NVIDIA Brev instance on your machine
Once your Brev instance has been provisioned and built, connect to it locally through Visual Studio Code or through a terminal.
# open the instance in VS Code
brev open $(whoami)-scipy-2026 code
or
# start an ssh session into the instance
brev shell $(whoami)-scipy-2026